Pages

Tuesday, December 27, 2011

Monday, November 28, 2011

Flowers Take the Cake

Rather than attempting to dictate the entire process of creating a cake, this post will be an editorial for one small yet essential element to a cake, the decorative flowers. These flowers are made of gum paste and other “edible ” materials. However, they do not taste great, but will be a beautiful adornment on any cake.

First I made Calla Lilies. Here are 5 easy steps for creating this beautiful flower.

 gum paste shaping

cornmeal
Finished centers

1. For center, shape yellow gum paste into a log tapered at one end. Insert skewer into the wide end. Brush with piping gel and roll through corn meal in order to add pollen texture.
 2. For petal, roll out gum paste 1/16 in. thick, cut a heart shape out with a cookie cutter. Use veining tool to draw line down center of the petal.
 3. Wrap petal around corn starched dusted center, overlapping edge, and attach with piping gel.  
4. Hang upside down to dry.
5. Paint skewer green, dust flower with white pearl dust.


For the roses:

1. For center, same as the Calla Lily center, but with pink gum paste.
2. Roll out pink gum paste; using a knife cut pedal shape (as seen above). Make 15 petals in all.
3.  Wrap pointed end down on rose base, angling down to control the top. Repeat 15 times.
4. Completed bud should have tight opening at top, slightly curl back edge.
5. For calyx, cut calyx shape out of green gum paste, attach with piping gel.
6. Hang upside down till completely dry.
Flowers are time consuming, so be prepared to invest a couple of hours in order to make enough flowers for a cake.

Sunday, November 27, 2011

Rapunzel, Rapunzel...


This past weekend I created a Tangled (Disney's Version of Rapunzel) cake for my neighbor’s fifth birthday. Here are the steps to making this nontraditional cake:


1.    attach a four-inch PVC pipe to a thin wood board with screws and a drill. These materials can be found at any home improvement store.
2.     Bake a French vanilla cake in three circle 6x8 pans, and place them in the freezer to harden overnight. (Frozen cake is much easier to work with; it does not affect the taste or texture at all, and will defrost in time to eat.)


3.     While the cake is in the freezer, cover the board with blue and green fondant to resemble grass and a river. Then cover the pipe with grey fondant stamped with a brick pattern. Cover portions of the grey with smooth beige to resemble crumbling stucco.

needed materials: stamps, piping gel, fondant, and tools


4.   Cover Rapunzel’s tower with vines. For this cut flowers with a small tool and placed sugar pearls in the middle, then pipe the stems onto the tower itself with green royal icing and paste the flowers to the vines with piping gel and a small angled paint brush.


5.     Take the cake out of the freezer and frost with French vanilla frosting. Cover with beige fondant. Use brown wood stamped fondant to create home effects.


6.    For roof,  simply form rice crispy treats with hands into a cone shape and cover with small oval pieces of brown fondant to resemble shingles. The balcony is formed from rice crispy treats, covered with brown fondant, and attached to the cake with toothpicks and royal icing.


 Finished product. I loved making this cake, and really enjoyed the process, and she obviously loved the cake.

Monday, November 14, 2011

Wedding Cake Bliss


 Months ago I was commissioned to make a cake for a couple whose wedding is this week. I have been working on the wedding cake, and cannot wait to show the bride the finished product. The cake she requested is very simple in design and flavor, yet elegant. Here is how it is done:

This cake is comprised of white batter, lemon filling, French vanilla frosting, and Styrofoam. Yes, I said Styrofoam. The bride only wanted the top layer of the cake to be real cake and the bottom two layers to be fake. The Styrofoam layers are covered in fondant and decorated to match the top layer. Styrofoam based cakes are an easy and quick alternative to an entire cake edible cake, and not to mention quite a bit cheaper. Cake Styrofoam differs greatly from standard Styrofoam in texture and density, and can be purchased at ABC Cake in Phoenix or Caketini in Gilbert.

(Top layer still in the process, slightly resembles an egg)


(Stacked top layer waiting to be covered in fondant)

The top itself is three layers of six inch cakes. I frosted each layer, piped the outside rim, filled the middle with lemon filling, and stacked the three sections. It is essential that the top layer is level, because the bottom two layers will be perfectly flat due to the Styrofoam, and it will be very obvious if the top layer is uneven.
 
(Bottom layer halfway through decorating process)

The entire cake is then covered in white fondant. You will have to be very precise when smoothing out the fondant for the first layer in order for it to look just as smooth as the bottom two. I then used piping gel to attach large silver sugar pearls to the bottom of every layer in a wave like pattern. I also added real flowers that match the wedding to the very top.

Sunday, November 6, 2011

In True Mad Hatter Fashion


Yesterday I made my first attempt at a “Mad Hatter cake” I sure did learn a lot about the art of cake making. Mad Hatter cakes are obviously named after the Mad Hatter’s tea party from the classic novel Alice’s Adventures in Wonderland; I love the literary reference and can imagine similar cakes filling the quirky party table. This style of cake is really fun for birthday parties, bridal and baby showers, etc. Sometimes a bride will even pick a Mad Hatter for a wedding cake, and that is when you know they are going to have the kind of nontraditional reception that you want to be at!
Altogether, from start to finish I have 10 hours invested into this cake, and to be honest I will not make another Mad Hatter for my own amusement, because it does involve a great amount of work, and an even greater amount of patience in order to cut and place the actual cake materials correctly.
Here is how it is done. I chose to do three layers, anything over three for this style and the cake becomes messy and unorganized. Each layer has to be cut at an angle, with a circle cut out of the middle in order for the cake to appear crooked and leaning when in reality it stands straight and level. Needless to say this is the most difficult part of the entire process, and a good portion of the cake is cut and discarded. 
The first layer of my cake is cherry chip baked in a 10 inch pan. I found that 10 inches was not enough space to work with, 12 inches would be more sufficient. I frosted and covered the cake in white frosting, and with black fondant cut zebra strips and attached them with piping gel.
 The second layer is chocolate cake, frosted and covered with pink fondant. I piped on the swirl design with black frosting and a size two round tip. A note on the black frosting and fondant, buy these, never attempt to make them on your own. You will never be able to get them black enough they will always appear grey and become very sticky with too much food coloring. Instead you can purchase these products at any specialty bake shop such as ABC Cakes in Phoenix, or Michaels carries a limited quantity.
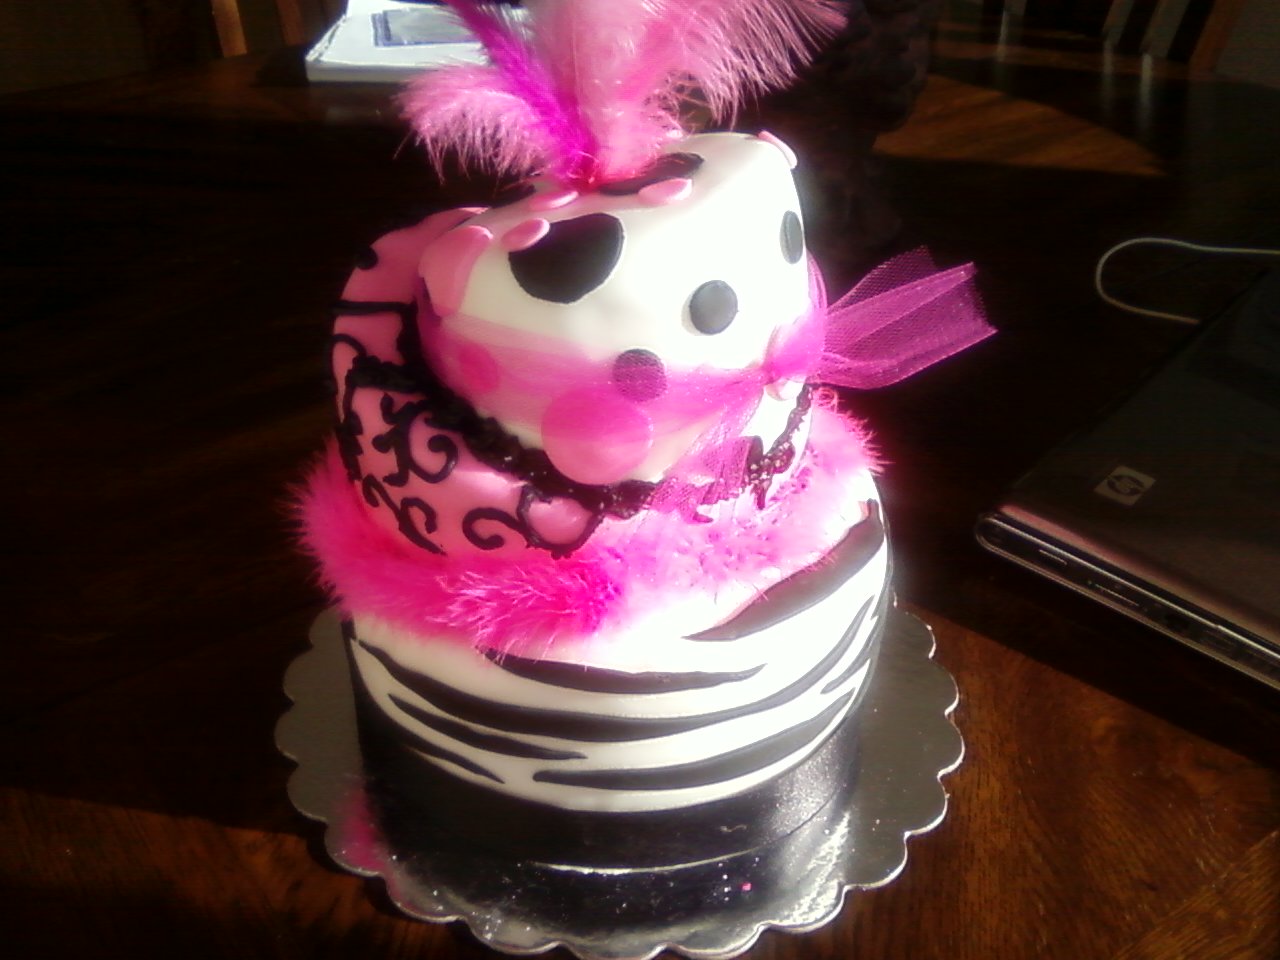
 The top layer is funfetti (I thought it went well with the theme and my husband loves this flavor), covered in white fondant, with pink and black fondant polka dots.  To complete the look, I stuck hot pink feathers into the top layer, forcing them to stand straight up, and adorned the middle and bottom layer with ribbon and hot pink tooling.
Easy enough right?  Not exactly, but after everything I put into this cake I am very pleased with the way it turned out and have grown immensely as a cake creator as a result.


Sunday, October 30, 2011

Special Order Cupcakes

Cupcakes are all the rage these days, and this past weekend I made individual cupcakes rather than a large multiple layer cake for a friend’s luncheon. Cupcakes are a fun alternative; there is not cutting, mess, or hassle when serving the delicate little morsels to the guests. Cupcakes are also a great way to bring variety into a special occasion’s dessert platter. For this occasion I made three very different types of cupcakes.


In the process, these cupcakes have been baked and filled.


Finished product
1. First and foremost, red velvet with cream cheese filling and topped cream cheese frosting: This variety of cupcake is very popular right now and has such a rich and beautiful color, so it was important to add this flavor to the mix. For these I baked a simple red velvet batter into 100 cupcakes. After the cupcakes are completely cooled I filled them with a cream cheese filling. Cupcakes are extremely easy to fill; simply use a filling bag fitted with a pastry tip, gently push the tip into the cupcake and squeeze pudding or filling mixture into the center of the cupcake. Filling adds flavor and texture, which will be appreciated and enjoyed by guests. I then frosted the cupcakes with a cream cheese frosting, added a yellow fondant rose and leaf, and sprinkled a few sugar crystals on each dessert.


Handmade fondant acorns

Chocolate cupcakes
2. Chocolate cupcakes with buttercream frosting and Oreo pudding filling: These cupcakes were made the exact same way but with chocolate batter, butter cream frosting, and filled with Oreo pudding. In order to dress up these cupcakes, I made a fondant acorn for each top, which I formed with two shades of brown fondant.


Final cupcake display

3. French Vanilla cupcake with lemon filling and buttercream frosting: Same concept here, except I simply topped these cupcakes with fall sprinkles.
These cupcakes were a huge success with the guests, which was made evident by the fact that each and every one was eaten by the end of the event.